Annotation
- Annotation represents the additional information of the program or provides the metadata of the program.
- We can add annotations on classes, methods, interfaces, packages, etc. After adding the annotation it cannot affect the source program.
- Two types of annotations:
- Inbuilt Annotations: Defined by the system itself.
- Custom Annotations: Defined by user or client.
Custom Annotation
- Custom Annotation means the user or client creates the annotations by themselves and uses them very effectively in the program.
- Types of Custom Annotations
- Marker Annotation (Without declaring any method)
- Single-Valued Annotation (With single method)
- Multi-Valued Annotation (With multiple methods or more than one method)
1) Marker Annotation:
					public @interface class_name{

}
- This is the Marker Annotation. In Marker Annotation, there is nothing to declare any method.
2) Single Valued Annotation:
					public @interface class_name{
	data_type method_name();
}
3) Multi-Valued Annotation:
					public @interface class_name{
	data_type method_name();
	data_type method_name2();
	data_type method_name3();
	……
	……
}
Ways of Creating Custom Annotations
- There are three ways to create custom annotations:
- Class Level Annotation
- Field Level Annotation
- Method Level Annotation
1) Class Level Annotation:
- When we declare the Class-Level Annotation by using the @Interface annotation.
					public @interface class_name{

}
- The next step is to provide the @Target and the scope of the annotation which means adding the @Retention of the annotation.
					@Target(ElementType.TYPE)
@Retention(RetentionPolicy.RUNTIME)
public @interface class_name{

}
- @Target and @Retention annotations are called meta-annotation.
- Here, declare the @Target annotation indicates the custom annotation that can be used for annotating, and in this annotation, we declare various types of ElementType like,
| Element Type | Description |
| TYPE | You can use this ElementType on the class level, interface level, or on Enumeration. |
| FIELD | You can use this ElementType on the field level. |
| METHOD | You can use this ElementType on the method level. |
| CONSTRUCTOR | You can use this ElementType on the constructor level. |
| LOCAL_VARIABLE | You can use this ElementType on the local variable. |
| PACKAGE | You can use this ElementType on the package level. |
| ANNOTATION_TYPE | You can use this ElementType on the package level. |
| TYPE_PARAMETER | You can use this ElementType on the type parameter. |
| PARAMETER | You can use this ElementType on the formal parameter. |
- You can also declare multiple annotations in ElementType like,
					@Target({ElementType.TYPE, ElementType.METHOD})
@Retention(RetentionPolicy.RUNTIME)
public @interface class_name{

}
- Here, declare the @Retention annotation specifies the scope of the annotation and in this annotation, we declare various RetentionPolicy like
- RUNTIME: This Retention Policy indicates that the annotation is available at runtime or we can use our annotation on runtime.
- CLASS: It is a default Retention Policy in Java. This Retention Policy is used in the .class file and discarded on RUNTIME.
- SOURCE: This SOURCE Retention policy is also discarded at RUNTIME.
2) Field Level Annotation:
- We are annotating the field by using the same syntax as in Elementype but changing the type FIELD.
					@Target(ElementType.FIELD)
@Retention(RetentionPolicy.RUNTIME)
public @interface class_name{
	String key() default “ ”;
}
3) Method Level Annotation:
-
- We annotate the method. This method-level annotation initializes the object at the method level and indicates that this annotation identifies or marks it as a method by using @Target annotation.
					@Target(ElementType.METHOD)
@Retention(RetentionPolicy.RUNTIME)
public @interface class_name{
}
There are some other annotations like, @Inherited and @Documented.
- @Inherited annotation is used when SubClass extends the SuperClass and SubClass uses the same annotation that SuperClass is used at that time @Inherited annotation is used.
- Example: There is “A” as a SuperClass and “B” as a SubClass. Now B used the same annotation that A can use.
					@MyAnno(Parameters)
public class A{
}
					@MyAnno(Parameters)
public class B{
}
					@Inherited
public @interface MyAnno{
}
- We have to declare the @Inherited annotation when we are creating the Custom Annotation.
- @Documented annotation is meta-annotation. This tag will be used after when our software is ready. When we are declaring the custom annotation without using @Documented annotation the description of the annotation will not show on the Javadoc tool (On Java Document).
					//By without using @Documented annotation
public @interface class_name{

}
					//With using @Documented annotation
@Documented  @interface class_name{

}
- After using the @Documented tag, we are showing all the descriptions with the tag which are showing on the Javadoc tool(On Java Document).
					//With using @Documented annotation
@Documented
@interface class_name{

}
Example of Custom Annotation
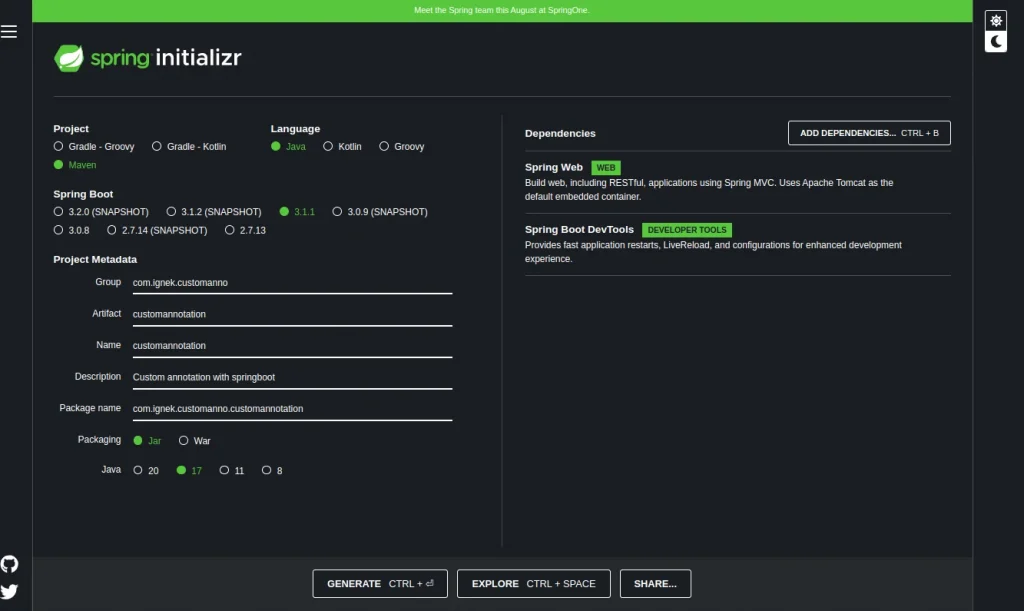
- Step 1: Create a Springboot project using Spring initializr.
- Step 2:Choose the Project field as Maven, language as Java, Springboot version, give the name to the project, and add dependencies like Spring Web and Springboot dev tools.
- Step 3: In the src/main/java directory, create an interface (here, SmartPhone). After creating the interface, declare ”@” before the interface i.e. “@interface”.
					//SmartPhone.java
package com.ignek.customanno.customannotation;

import java.lang.annotation.ElementType;
import java.lang.annotation.Retention;
import java.lang.annotation.RetentionPolicy;
import java.lang.annotation.Target;

@Target(ElementType.TYPE)
@Retention(RetentionPolicy.RUNTIME)
public @interface SmartPhone {
	String os() default "Symbian";
	int version() default 1;
}
- We declare EntityType as TYPE, so we can use this annotation at the class level, interface level, and enumeration.
- Here, RetentionPolicy is a RUNTIME annotation available at runtime.
- We declare two methods os() and version() and also declare the default value. If we do not declare any explicit value, the value returned by these methods will be considered as a default value.
- Step 4: In the src/main/java directory, create one class(here, NokiaSeries) and assign custom annotation @SmartPhone.
					// NokiaSeries.java
package com.ignek.customanno.customannotation;

@SmartPhone(os="Android", version=6)
public class NokiaSeries {
	String os;
	int version;
	public NokiaSeries(String os, int version) {
		super();
		this.os = os;
		this.version = version;
	}

}
- Assign custom annotation @SmartPhone and into the parentheses pass the parameter explicitly. If we do not assign a parameter to the parentheses, it is called the default value.
- Step 5: In the Main file.
					// CustomannotationApplication.java
package com.ignek.customanno.customannotation;

import java.lang.annotation.Annotation;
import org.springframework.boot.SpringApplication;
import org.springframework.boot.autoconfigure.SpringBootApplication;

@SpringBootApplication
public class CustomannotationApplication {

	public static void main(String[] args) {
		SpringApplication.run(CustomannotationApplication.class, args);

		NokiaSeries ns = new NokiaSeries("Fire", 5);
		Class c = ns.getClass();
		Annotation an = c.getAnnotation(SmartPhone.class);
		SmartPhone s = (SmartPhone) an;
		System.out.println(s.os());
		System.out.println(s.version());
	}
}
- We declare the object of the NokiaSeries class and pass the argument and test which values will be called.
- After creating the object of the NokiaSeries class, we get the class by using that class object and the getClass() method.
- And then get the custom annotation interface by using the getAnnotation() method.
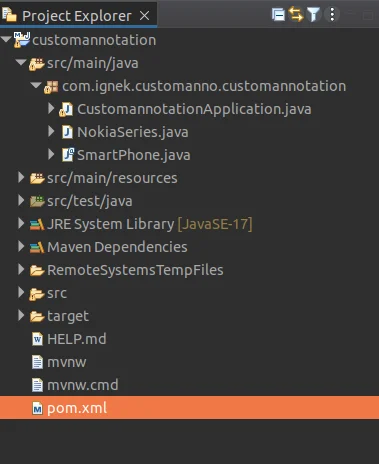
- Step 6: Create the project structure like this:
Output:

Empower your web projects with Spring Boot Web Development services. Craft efficient, scalable applications with ease. Accelerate your Spring Boot development journey with our expert team. Let’s build your digital presence together!


